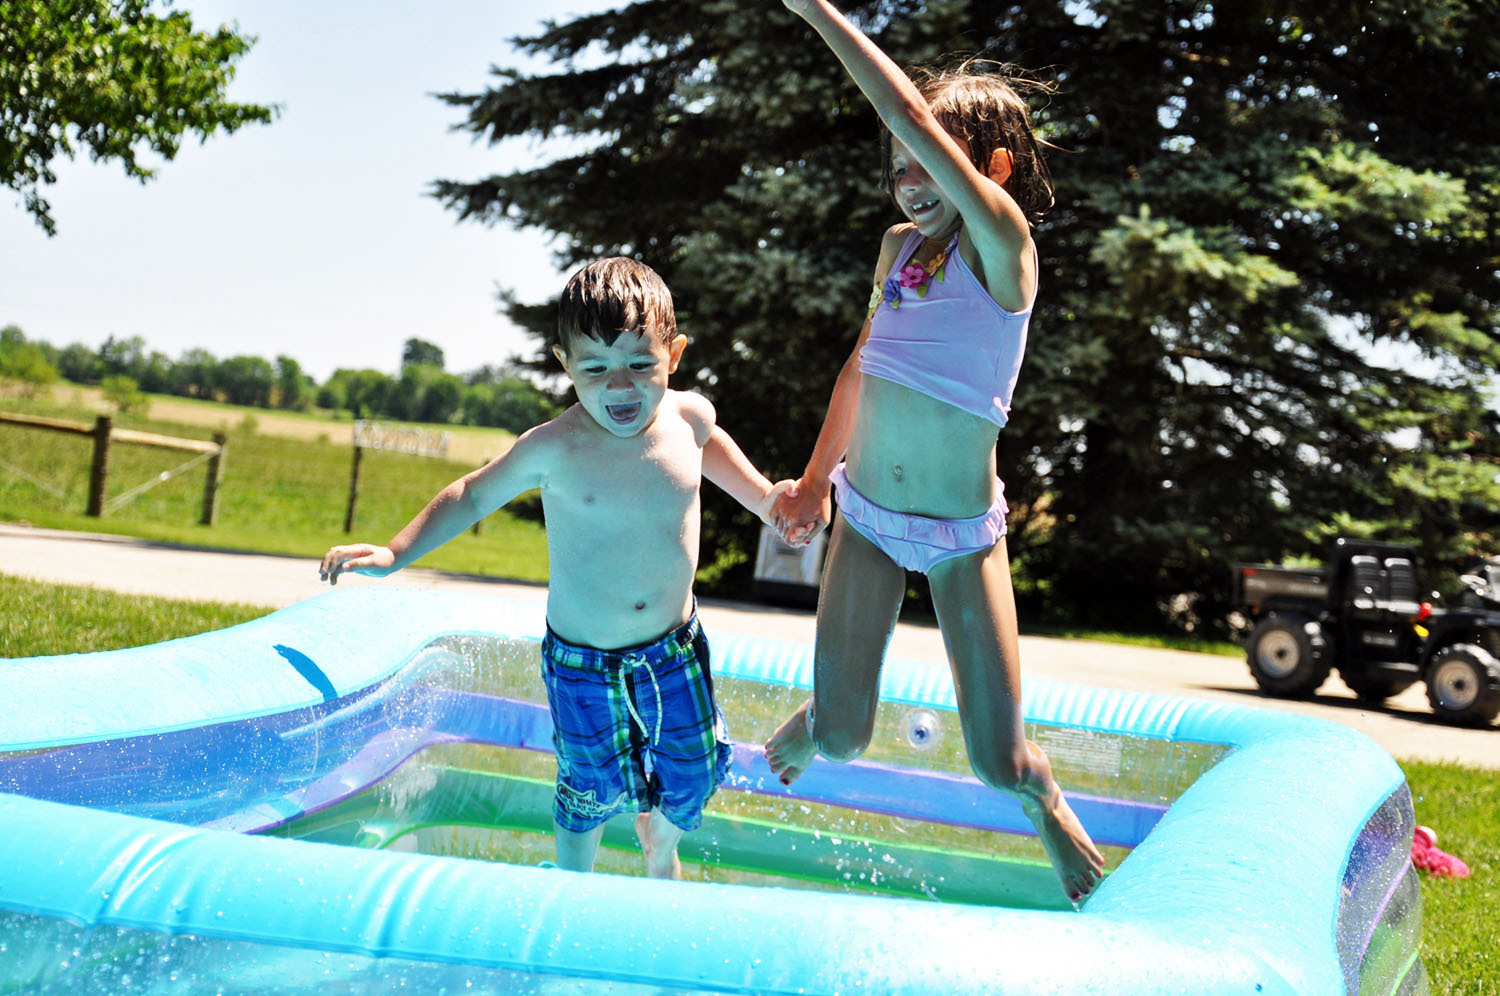
Harvest season is quickly
approaching, and bringing a lot of long hours with it. To prepare, ten of our
blogger friends spent a day making ten freezer meals! We could all use a little
extra time some days. Check out their adventure (and their recipes) here!
If you are looking for a recipe to take to a Holiday party I have the perfect one, Peanut Butter Truffle Brownies!! Perfect with a tall glass of ice cold milk!
I hope you enjoyed Cocoa Day!! I know I will all week long!!
Psst... have all you chocolate lovers entered our Chocolate Giveaway this week.
Dear Reader-
I am so excited to share with you what my friends and I have been baking up in our kitchens over at The Real Farmwives of America and Friends. It is cookie time and we have been holding a virtual cookie exchange and sharing all the recipes and step by step instructions with our readers!
So far, you will find recipes to such yummy delights such as:
And, if that doesn't soothe your sweet tooth, on Tuesday Miss Liz of 2 Maids a Milking will be hosting a cookie recipe link up on our RFOA blog where bloggers across the blogosphere will be linking up their best cookie recipes!
So grab a big glass a milk and let us know what's your favorite cookie?
Ever since I was a little girl, one of my absolute favorite
parts of summer has been going to the State Fair. But it has nothing to do with
the carnival rides, elephant ears, other fried delicacies or even the
Grandstand entertainment.
It has everything to do with showing cows.
Huh? What did you say!? I said … showing cows.
For anyone who doesn’t show cows, I can imagine it would
difficult to fathom the thrill of leading a cow around an arena to be judging on
its confirmation. But ever since my family bought my first Jersey calf (her
name was Shirley – see photo below) when I was a first-year 4-Her, I
have been breeding and raising my own herd of registered Jersey dairy cattle –
you know, the cute lil’ brown cows!
So for me, it’s all about the genetics and putting all the
hard work of the past year up against your competitors. And in Indiana, the
competition is fierce, especially for Jerseys. But aside from the thrill of
competition, there is the camaraderie among your fellow exhibitors. These are
folks who are not just cattle folk, they are friends. Friends you look forward
to seeing every year at the same place – the State Fair. When I was growing up,
these friends taught me how to play euchre, and oftentimes helped get me into
no-good trouble. Now these friends are married and starting families of their
own.
As I looked back in my archived photos for this blog post,
all the memories from the Ohio State Fair came flooding back in. My first
crush, my first ribbon, winning showmanship, serving as the Ohio Jersey Queen,
playing cards until the wee hours of the morning, washing heifers at 4 a.m.,
the junior Jersey pizza party, water fights and the year we got so much rain
that water started flooding into the barn.
Since I married a Hoosier farm boy, I began showing my
Jerseys (as an adult) at the Great Indiana State Fair and have made a ton of
new friends here. I love my Indiana dairy friends and I seriously heart the
Great Indiana State Fair … not for the fair food (although the Pork Tent and
Dairy Bar is a must-stop on a daily basis for me) or for the fair entertainment
… but for the cow-showin’ good time spent with great friends and my family.
Did I happen to mention … this year will be Baby RayRay’s (my
one-year-old daughter) first State Fair ever – to say I’m excited to see her
toddling down the aisles of the cattle barn would be a supreme understatement!
Want to learn a little bit more about me - the Hoosier Farm Babe and
raising Jersey dairy cattle? Come visit me at the Indiana State Fair in the
Dairy Barn (center aisle) next week (Aug. 14-17) and we can grab milkshake from
the Dairy Bar together! Yum!
I am a State Fair junkie. There, I said it! I just love that
place. I have so many memories from all stages of my life that I really think I
could write a book! From the time I was born, my family would take day trips to
the State Fair every summer. Through 4-H, I exhibited pigs for all 10 years. I
was a 4-H intern and lived there one summer. I worked in the Swine Barn for 5
years with Lonnie and the Extension staff. And now I get to take my kids and
just have fun at the fair!
Believe it or not, I have only missed one year that I know
of. (I’m not sure about my first few years of life though!) Yeah- that’s right.
I missed the State Fair of 2006 because our Wild One was only 8 weeks old and
my Miss Bug (2 years at the time) was really sick and I mean sick. I was so
devasted to miss but it just didn’t work out that year.
So, thinking of my fondest memories at the great Indiana
State Fair, here’s what I came up with:
As a really young child - 1) Having lunch out of the back of
our Mini Van in the infield - my grandma would slice a fresh tomato and we
would throw it on a bologna sandwich for lunch! 2) Getting to pick something out in the
Exposition Hall for $5 or under 3) Watching the World’s Largest Boar contest
As a 4-H member – 1) Making all kinds of friends in the
livestock projects 2) Seeing George Strait for the first time from the 3rd
row 3) Exhibiting my chocolate cake in the 4-H Foods project 4) Watching the
Hot Air Balloon launch in the infield at 6:00 AM 5) Enjoying the Dairy Bar chocolate
shakes 6) Serving as the Purebred Pork Queen in 1991 (yes, there is such a
thing and yes – I’m really proud of it!!!)
And later in life – 1) Interning at the fair and riding in
the parade every day 2) Meeting my hubby for the very first time – YES – now
you see why that place is so special! We met in 1995 right there in the middle
of the fair in the FFA Pavilion! I was volunteering with 4-H and he was serving
as a State FFA officer. It’s funny how that place has impacted my life! I
have so many fond memories. It made me who I am – the friends I made, the
career I chose and the hubby that I have!! I just love that I get to take my
kiddos to the fair now and show them all of the things that I love about it. I
look SO forward to their 4-H years and the memories that we will make as a
family! So, here’s to the GREAT Indiana State Fair – a place where memories are
definitely made!
After a bit of a rainy start our garden is really starting to take off. Lots of the plants are blooming or starting to put on fruit. So here's a little peak at what's growing in my garden.
1.) Potatoes, but not just any potatoes Blue Adirondack Potatoes that will be purple in color on both the inside and the outside. We are anticipating harvesting these soon.
2.) Butternut Squash. We did have some Spring Greens planted and after we were done with them we planted squash in its place to be ready this fall.
3.) Kohlrabi. Not many people know what Kohlrabi is but it a bulb like vegetable that kind of taste like a radish uncooked or broccoli after it's cooked.
4.) Tomatoes. I've got several blooming and several starting to put on fruit and I cannot wait for them to turn red so we can start to enjoy them.
5.) Zucchini. These guys have just started to bloom and take off.
6.) A Sunflower. I always plant sunflowers in my garden because they look so pretty, and this one is almost as tall am me.
7.) Green Beans. This year we tried pole bean which are growing up a fence. I'm hoping this will make for some easier harvesting.
8.) Cilantro. We are trying herbs in our garden for the first time this year and this is going to taste great when I make fresh salsa.
9.) Eggplant. This is one of many blooms on our eggplants, and I love the purple color.
I scream, you scream, we all scream
for ice cream!!!
What a great way to celebrate summer –
ice cream sundaes, ice cream cones, milk shakes, and especially homemade ice
cream! We do our fair share of consuming ice cream ALL year round but July is
actually National Ice Cream Month! In 1984, President Ronald Reagan made this
designation because he loved ice cream so much. In fact, the third Sunday of
the month is even National Ice Cream Day – which happens to be on Sunday, July
17th this year.
If you’ve ever wanted to make homemade
ice cream but don’t have an ice cream maker, you are in luck! Here is a simple,
easy, and super tasty treat that you can make with ingredients that you
probably already have at home. This one is always a winner with kids too
because they can get involved and make their own!
Being a dairy farm family, we love to
find ways to enjoy our dairy products and this one was a huge hit with a group
of kids at our farm during a summer cow camp! We hope you enjoy!
Ice Cream in a Bag
Ingredients
1 T. sugar
½ C. whole milk
or half & half
¼ t. vanilla
extract
6 T. rock salt
1 pint-size
Ziploc plastic bag
1 gallon-size
Ziploc plastic bag
Ice
How To Make It
Fill the
large bag half full of ice, and add the rock salt. Seal the bag.
Put milk,
vanilla, and sugar into the small bag, and seal it.
Place the
small bag inside the large one and seal again carefully.
Shake until
mixture is ice cream, 5-10 minutes.
Wipe off top
of small bag, then open carefully and enjoy.
Feel free to
add chocolate syrup, nuts, strawberries or any other ice cream topping!
Summer fun on the farm...oh boy, where do I begin?! Our Spring and Summer is spent mostly
outside. The television is rarely turned
on and supper isn’t ready until sundown (for us adults, at least). It’s a time of year we thoroughly look
forward to...and try to enjoy to its fullest before we hibernate after
harvest...And it is not entirely consumed by tractor rides or late nights in
the field...those days have passed until Fall.
Aside from the regular kid friendly and fun farm duties...there
is an endless amount of fun a kid can have.
With 18.5 acres to explore at our main base, life never gets boring for
our 3 year old and 18 month old! And in
the midst of all the fun they are having...we are always teaching them how to
respect our animals and how to be safe around dad and grandpas equipment...
Our
kids need to know that a combine or tractor is not a jungle gym...though it
seems like it sometimes. Many life
lessons are being taught through the Summer months without them evening knowing
it...especially with our son! The whole
respecting of the farm starts at a very young age...and we can already see the
passion in our sons eyes...It just amazes us.
And all we can hope for with this lifestyle is that we are
instilling amazing memories for our children on our family farm. Between picnics in the backyard while
watching our cattle, running around on the dirt pad where our new barn will go,
catching lightening bugs in the unused pasture, to late night rides on grandpas
restored old tractors...their life is truly unique and something we hope they
cherish forever.
Our farm can be a child’s
dream world where their imagination can run wild...without restriction (most of
the time)! And you know what the best
part is?...Children that sleep until 8:30 the next day...mom likes that one a
lot!
After the long, cold winter we had, I am craving pork chops right off the grill. And boy do they taste so good after spending several hours in a good spicy brine. Learn more about how to make your own brine over at my Hunk of Meat Monday post.
But to learn more about grilling, and gas grilling to be exact, it is all right here.
To start, you want to start with a great piece of meat. I love to grill with cuts of meat that have the bone. I think it adds to the flavor of the meat. I also would recommend having a piece of pork that is at least an inch thick.
Whether you brined, marinated or dry rubbed you pork, let it sit out for about 15 minutes at room temperature so it is not so cold when you throw it on the grill.
I grill at a medium heat. You don't want to torch the juice out of your meat. You want to make sure you preheat the grill just like you would a traditional charcoal grill. I place my pork chops over the heat.
Unlike beef, I need to make sure my pork to be done. Not hockey puck done, but fully cooked.(Our mothers were taught to cook the hell out of pork to kill all the parasites that pigs were exposed to when they were raised on pasture. These parasites have been eliminated from the pigs since we have moved pigs into barns. No fear, it is not your mother's pork.)While pork is referred to as the other white meat, it is a red meat. So, don't be afraid if the inner meat is still pink as long as it reached 145-150 degrees on the grill.
I seasoned my pork with a BBQ seasoning salt. I cook for about 8 minutes on each side for an inch thick chop. After cooking on both sides, you want to let your chops rest for 5 minutes before cutting. Resting insures the juice will be locked in for the most flavor.
If you love lots of BBQ sauce on your chops, grab your favorite bottle of sauce. What is your family’s favorite sauce? Ours is Sweet Baby Rays Honey Chipotle Sauce.
Now I don’t know about you, but to me, Mother’s Day is not about me, but about my mom and mother-in-law. Don’t get me wrong, I love being a mom more than anything else in this world and I always love to see what my little one are going to do for me for Mother’s Day; however, ultimately for me, it is about making the day special for my mom and mother-in-law.
We live 3 hours from my mom, so since before I marriedThe Farmer, I have spent Mother’s Day with his family and trying to make the day very special for his mom since she raised 3 amazing boys.
Although my sister-in-law and I are still finalizing the plans for Mother’s Day and I don’t exactly know what is on the menu yet, I thought I would share some links to some amazing recipes that would make any mom happy whether you need goodies for breakfast, lunch, dinner, dessert, or something in-between. So good luck and Happy Mother’s Day!
If none of these are quite what you are looking for or need, it is quite possible you'll find something in the virtual recipe boxes ofGooseberry Patch,Allrecipes, andFood Network.
At Indiana’s Family of Farmers, we love our pets and our pigs.Whether our household pet (and we all have at least one good barn dog) or our precious livestock, taking care of the animals entrusted to us is a duty and a privilege.
That’s why IFOF is a sponsor of the 8th Annual Mutt Strut sponsored by the Humane Society of Indianapolis.The event, which will be held next Sunday, May 1 at the Indianapolis Motor Speedway, gives dog lovers the chance to walk around the famous track for a good cause.All proceeds will go to the Humane Society of Indianapolis – so you can know that Indiana animals will be cared for with the proceeds!
Stop by the IFOF booth and dress up your pup with an IFOF bandana.All it takes is a $1 donation to the humane society to take one home with you.
In honor of our involvement with the Indy Mutt Strut(and because we just love all things animals) Indiana’s Family of Farmers is making a special offer.
We are going to donate $250 to your favorite local pet shelter.All you have to do is reply to this post with your nomination.Tell us why this shelter is worthy of our donation – of course, cute puppy and kitty pics are always welcome!
So tell us your story (on here, facebook or twitter) and we’ll choose a winner later this week!
When Indiana's Family of Farmers asked me to come up with some fun and interesting Easter Recipes, I started searching the internet and came across some great ideas out there in the blogosphere!
Below are 10 links I found to be interesting... in no particular order. Some are tried and true traditional dishes while others are great ideas that I wouldn't mind giving a try.
With the warm weather we have been experiencing in Indiana, you can’t help but want to be outside playing in the dirt. At our house, that is exactly what we have been doing. After I convinced my husband to build me raised beds for our vegetable garden this year, we had to do a fast track to soil prep. Luckily, we still have about 15 dairy heifers at the farm still that provided just what our soil needed. Organic matter and nutrients.
Nothing is better than fresh cow manure for your garden. I know I am a bit biased. We brought over a skid loader scoop full and layered the top soil and manure together.
We let it settle for a week and then hit with our tiller to get all the organic matter incorporated into the top soil. There were quite a few red worms in the manure as well which really helped get the coil aeration going as well.
Now, we are going to wait for the soil to settle another week before planting our spring plants. One thing I feel I have to mention. I am a firm believer of using organic matter and fertilizer that we get from livestock; however I am not going to plant an organic garden. By mid-summer my veggies will be covered with various pests from bugs to worms to disease. Trust me, Sevin Dust will find its way to my plants. I will win the battle over the pest.
As you can see I have some extra top soil and manure left after I filled up my raised beds. No fear though, I have flower boxes to fill later this spring. I just piled up the soil and manure by my compost box.
Do you remember your grandparents or parents having compost piles on the side of the barn when you were little. I always remember seeing lots of grapefruit rinds and eggs shells in my grandparent’s compost pile. Well, mine currently looks like this:
Oranges and egg shells sprinkled with kitty litter and the remnants of last summer’s potted flowers. This is going to be some divine potting soil in the very near future when I get the manure and top soil mixed in with it. Throw in some red worms to speed up the break down cycle and you have happy flowers mid-summer.
In January, I undertook a new challenge. An Iron Chef Challenge. My friend Ott, A. over at A Latte with Ott, A was running an Iron Chef Challenge for all her bloggy friends. And the theme for January was duck! I love duck! I had only cooked it once before, a whole roast duck, and I loved that I had an excuse to try it again!
So I hit the cookbooks, and found a recipe for duck breast that looked yummy. Off to the local grocery store, where there was no duck breast to be found. Only a whole duck.
Hmmm.
Okay, so scrap the duck breast recipe, and look for a recipe that used the whole duck. I had done a whole roasted duck before, so I wanted to try something different.
I am a huge Alton Brown fan, and have yet to try a recipe from him that I didn’t like, so I cruised the Food Network website to find an AB recipe I could try. Oh, and did I find one! Mighty Duck! (Who can resist with a name like that?)
The problem? This is not a recipe for a whole duck. This is a recipe for a quartered duck. But I didn’t have a quartered duck… I had a whole duck!
Lucky for me, AB gives detailed directions on how to quarter a whole duck.
Lucky for you, I took pictures while I quartered my duck!
(Although AB says “a chicken is not a duck,” this technique will also work for a chicken, or a turkey, or whatever other kind of poultry you’re trying to quarter. Just substitute your poultry of choice wherever you see the word “duck.”)
Start with a thawed duck (sorry for stating the obvious here, but, hey, you never know!), and assemble the rest of your tools. You will need: a large cutting board, kitchen shears, and a large knife. I also had a cheat sheet. Unwrap your duck, and take out the giblets and the pop up timer (if there is one). Rinse off the duck so it is clean and shiny.
Put the duck on your cutting board, breast side down, and use your kitchen shears to cut off the wings. (Now he just looks sad.)
Pull the big flap of neck skin out of the way. (You can cut it off if you want to.) Using your kitchen shears again, cut through the ribs on either side of the backbone. Start from the neck and work your way back. When you’ve got the backbone free from the ribs and the meat, take it out.
Now put the duck breast side up on your cutting board. You should be able to spread it out so it’s kind of flat.
Again, with the kitchen shears, cut the duck in half, right down the middle of the breast bone. Now you should have two halves of a duck.
Next we need to separate the legs from the breasts. You should be able to see a division between the leg and the breast where there is not much meat. Use your big knife to make a crescent-shaped cut around the top of the leg. (We’re keeping the thigh and the drumstick together here, so don’t worry about separating those two parts.)
Do this step again for the other half, and, voila! Quartered duck! Great job!!
Just in case this didn’t get you quite the information you need, or if you want the details on how “a chicken is not a duck,” Alton Brown has a fantastic video detailing the entire process, with a chicken. Although, really, even if you are an expert in breaking down a chicken, this video is worth watching, for pure entertainment value alone! “Quoth the chicken, ‘fry some more!’”
You gotta love anyone who incorporates great literature into fried chicken! Oh, and the pan-fried chicken recipe is wonderful, too, although it’s just teased in the video. (If you want to skip right to the meat of the matter, the breaking down demonstration starts around 3:50 into the video clip.)
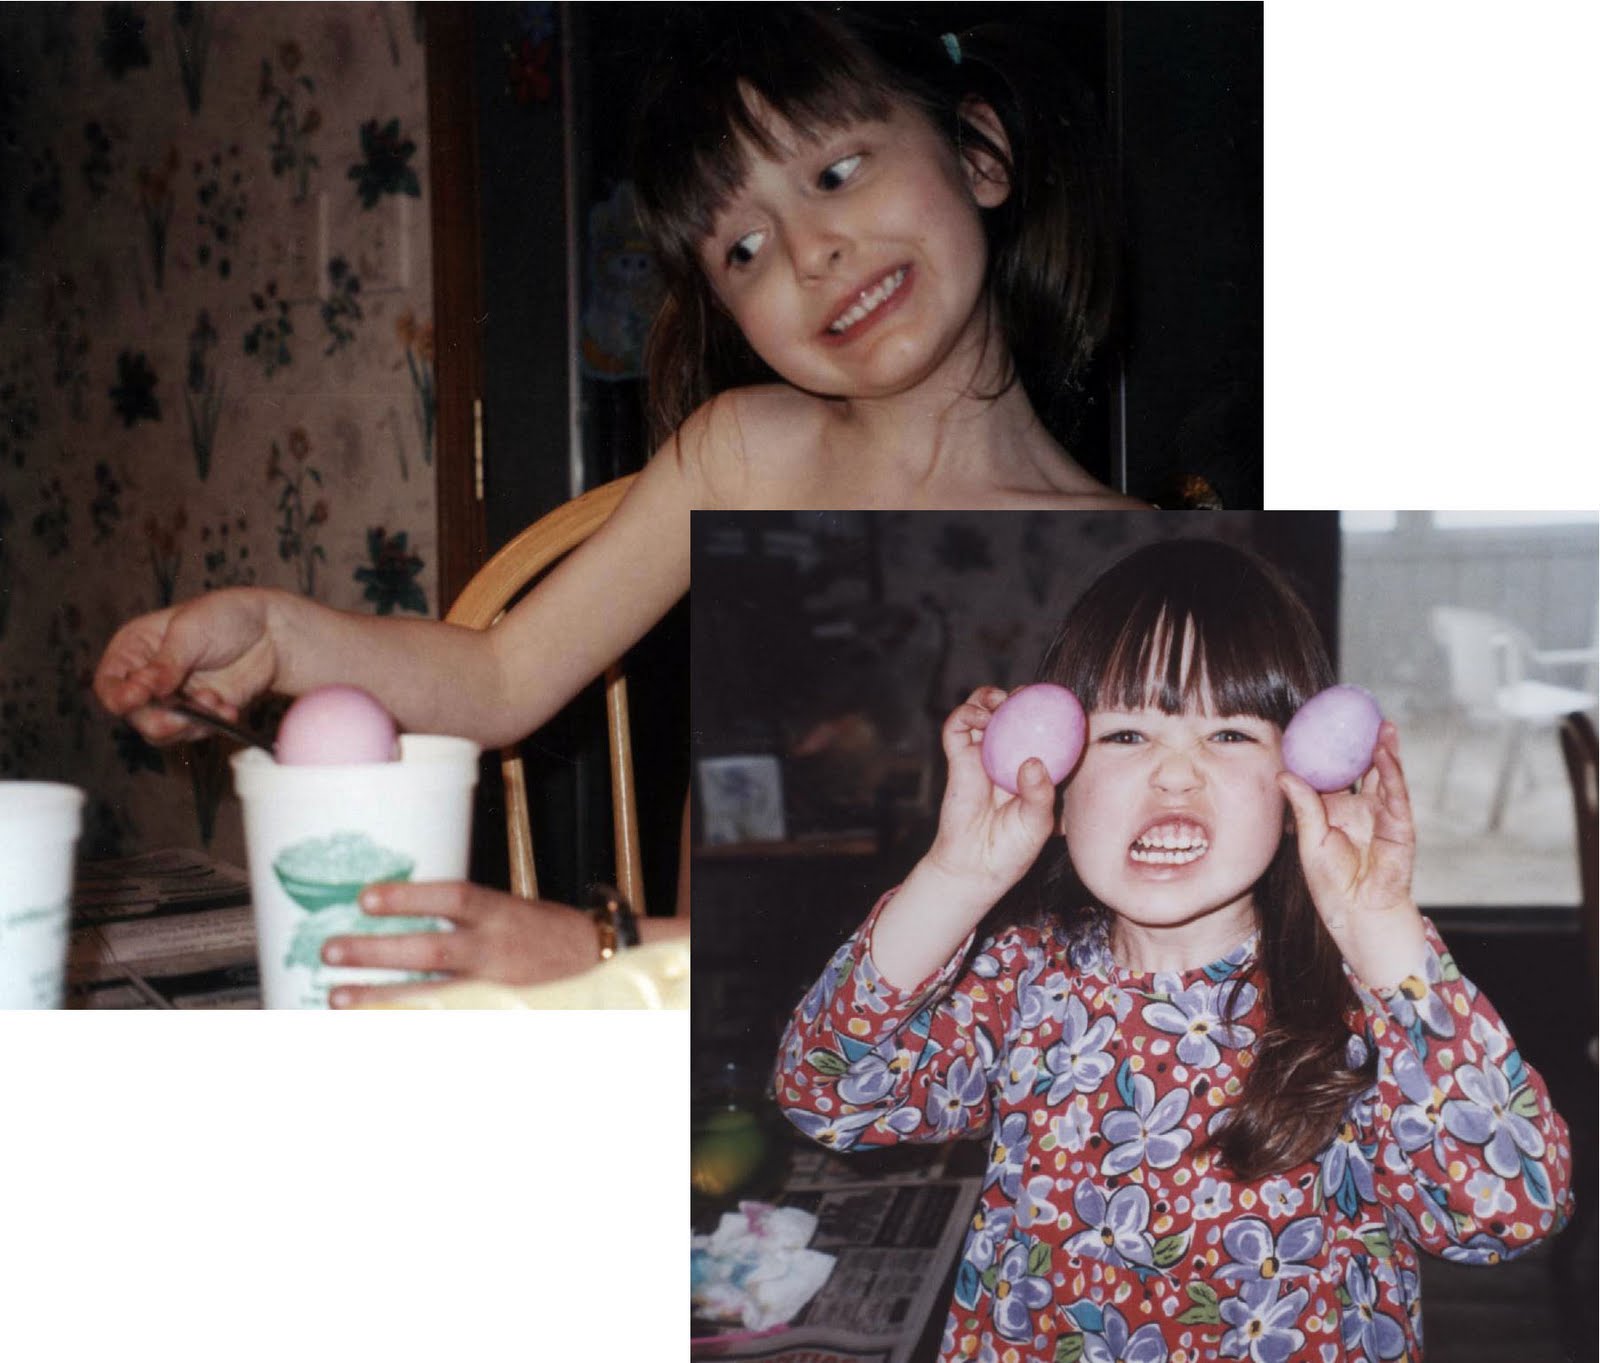
Beyond the significance of Easter in the Christian calendar, this season is also a fun time for family traditions—like coloring eggs.
My daughters, now 13 and 11, have enjoyed coloring Easter eggs from a very early age.
Side Note: I had a hard time finding a picture of Elaina wearing clothes while coloring eggs! So I had to do a little positioning of the pic of Diana.
I have to admit: We’re kind of a boring, traditional family when it comes to coloring eggs. Every year we break out the good ol’ Paas egg dying kit to bring a little color into our lives. After all, it’s inexpensive, convenient, easy to clean up and results in lots of pretty eggs (that will be part of lunches for a week or two!).
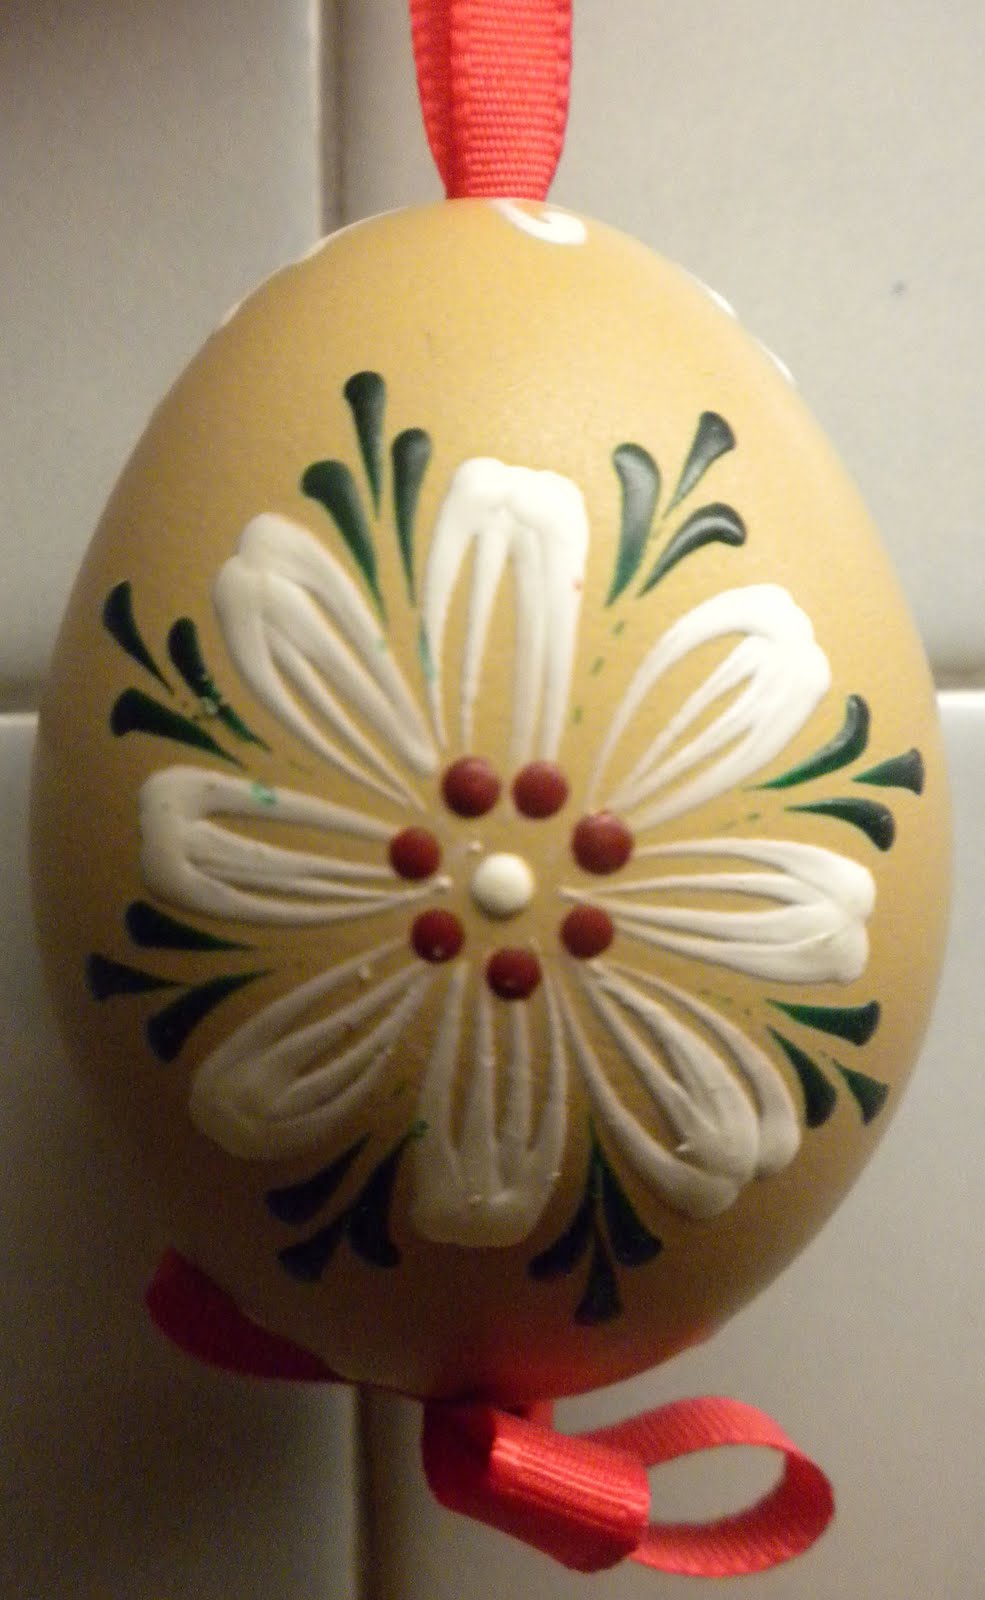
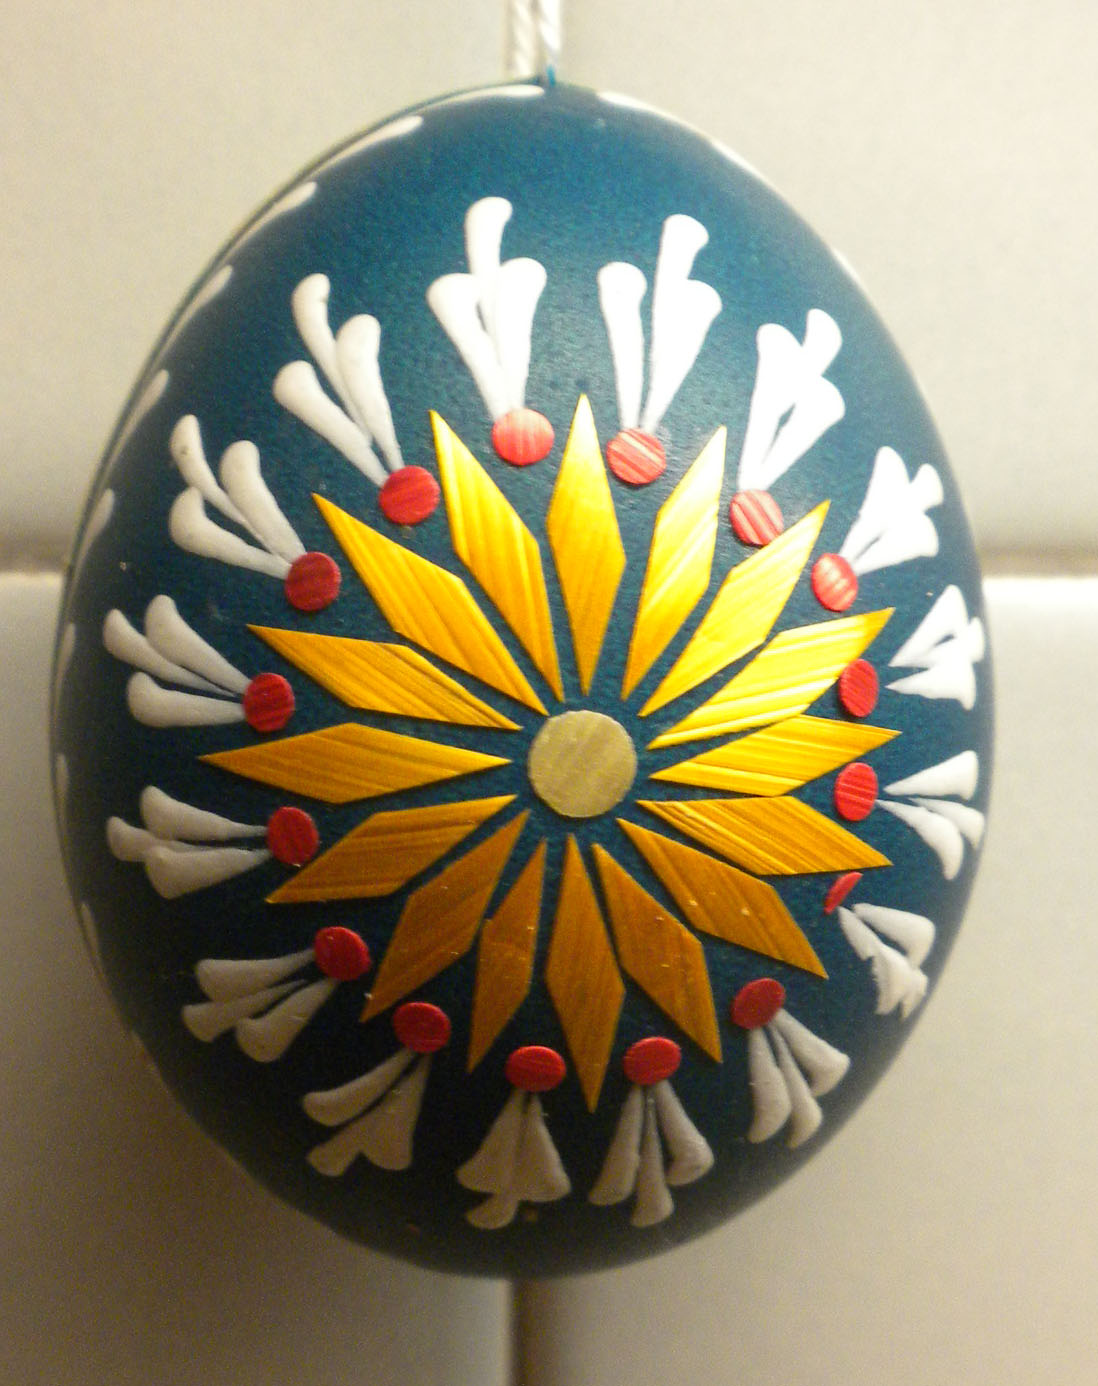
This year, we’re going to jazz things up a bit and try something different. I got a little inspired during a trip to Europe last year. Take a look at some of the beauties I brought back:
I bought these eggs (and about a dozen others that went to family and friends) while visiting Slovakia last year, when I had the privilege to be part of Class 13 of the Indiana Ag Leadership Program (ALP).
As part of the two-year ALP program, each class takes an international trip to experience the culture and learn first-hand about agriculture in other lands. Our class journeyed to Hungary, Slovakia and the Czech Republic.
In doing a little pre-trip research, I discovered that the people of that region have a couple of Easter-related traditions tied to their colorful eggs.
In Hungary, on Ducking Day (the Monday after Easter), the boys go from house to house and will sprinkle water or perfume on the girls they like. (This is the modern version of dousing them with a bucket of water like they did in the olden days!) The boy might ask for a kiss or a red egg—which was the positive response from the girl. Apparently, the color of egg she gave back was an indicator of her opinion of the young man.
The Czechs had a similar Easter Monday tradition of the girls giving decorated eggs to the boys. Only the eggs were given after the boys playfully whip the girls on the backs of their legs with pussy willow branches decorated with ribbons. The story goes that the pussy willow is the first to bloom in spring, and the whipping will bestow fertility.
While I’m not expecting any boys to come calling at our house on April 25, I think the girls will have some fun being a little more artistic this year. Although, I’m not sure we’ll be as detailed as the artist was for this egg. The gold-colored petals on the flower and the stripes on the grid are actually small, flattened pieces of a wheat stalk glued on the eggs.
Here’s the plan, in case you haven’t blown eggs before:
Carefully clean the outside of the uncooked eggs with a damp paper towel. (Because I’m a germ-a-phobe, I, personally, prefer to use a food-safe disinfectant like diluted bleach, since the kids are handling them.)
Gently pierce each end of the egg shell with a clean tack or pin. Use a long pin to break the yolk, or you won’t be able to blow it out. You can use a bulb-style ear-and-nose syringe to blow out the eggs.
After the eggs are empty, rinse them in a bowl of water. Next dip the shells in a bleach-water dilution to prevent anything from getting moldy or smelly.
Once the eggs have air-dried completely, they are ready to paint or dye.
For those of us who hate to see food go to waste, use the egg whites and yolks to make scrambled eggs—provided they haven’t sat out of the refrigerator for more than two hours.
If you have a fun and creative egg decorating idea, or even an egg that inspires you, be sure to share a link or post it on our Facebook page!